Aug 30, 2010

8/10: Wyatte the 1/2 & 1/2 Bear

This shirt and trouser combo jumped out at me when I visited the volunteer office. I really wanted to be the one to create the bear but saw the requester wanted a 1/2 & 1/2 bear, something I hadn't been shown how to do yet. I was assured by Carol at the office that I would be able to do it, so I left with this outfit and the shirt for Mike Bear.

Between helping to care for my mom after her strokes and the fear of starting something new, it took me awhile to get going on the bear but once I started it I did enjoy making it. I took several pictures along the way so I could remember how to do it when I make another 1/2 & 1/ 2 bear. 
front pieces cut
The bear is basically made with shirt as the top half and the pants as the bottom half. That means taking the two front pieces and the two back pieces, cutting them in half, extending the pattern for the seam allowance, cutting them all out and then sewing them all together so they match up. Then the rest of the top half is made with the shirt fabric and the rest of the bottom is made with the pants fabric.
Back Paw
Front Paws
I was fortunate to discover that the pant pockets were made with yet another fabric so I used that for the paws on the arms and the legs and the inside of the ears. There was a seaming detail on the pockets that I was able to incorporate into the paws. Sadly not enough of that detail to add to the ears, although I tried!
This bear was fun and challenging to make. I did get a little surprised when a well-worn pocketknife fell out of one of the the pockets when I started in on the project. I saved it and put it in the back pocket of the final bear. I think his lovely wife will be glad to know it was with him all this time and is being returned in his pocket, just where it belongs.

The rest of the story ... When the family came in to pick up their bear, they were told the story of the found knife. The wife said they had scoured the house trying to find it since it was a favorite of his. They were very happy to know it was with his clothing and not lost at all. Just waiting for the right time to return. This story is one that reminds me why I make these bears. Families care.


Aug 26, 2010

8/10: On becoming a Memory Bear ...

One of the questions I get when people find out I make Memory Bears has to do with how to people request the bears and how to they get to a volunteer to be sewn together. 

The person requesting a bear fills out the form you see on the left. (Clicking the picture will enlarge it). This is important for the Hospice Volunteer office staff and the person making the bear. The staff needs a way of tracking the bears from when the request comes in until it is delivered to the person requesting it. The person making the bear needs to know just what they have in mind when they think of the bear. Do they want a certain part of the fabric to be on the bear? Do they want a collar or a pocket used? Do they want buttons or embellishments on the garment used on the bear? We have guidelines we must use but the person requesting the bear does have some options if they want them. 

The most important part of the form in my opinion is the middle where the requester fills in who they are, who it's in memory of, what their relationship is to the deceased person and what the garment means to them. This gives the volunteer a little knowledge about the person they are honoring and it's very special to know. I have made bears for special dads, loving moms, brothers and sisters. As I make them, I feel the emotion they have for their loved one and I have the desire to make this unique bear as special as possible for that person. I know they loved the living soul and I want them to feel that love when they hold their bear. I imagine all the volunteers feel this way when they make a bear. It's a sacred thing.
 
The staff at the office put the fabric(s) and request forms in a plastic bag and place them in a closet. They are put in the order they are received with the oldest one on the top left and the most recent request on the bottom right. Please click this picture to enlarge it so you can see all the different colors and textures of the bears-to-be. There are blankets, sheets, shirts, blouses, full outfits ... in fact one of those bags called my name while I was taking this picture. See the second row, fourth bag from the right? The yellow is a tie with stick-figure children on it and a shirt and slacks are also in that bag. It's going to be a great bear and whoever wore that tie had to be a great guy. It will be a happy bear to make! I didn't pick it up because I have  bears waiting to be made for close friends.
After a bear is completed (and we try to do that within a few weeks of picking up the makings), the staff checks them in (remember the form we started with!) and processes them for delivery or pickup. They check them over to make sure they are ready and sometimes have to do a little repair work. This is why we return all the scraps, too! 
Then they tie a bow around the bear's neck with a tag that says who the bear was made for and the first name of the person who made the bear. They wrap it up in blue tissue paper and lovingly place in the bag to go home. Along with the bear is a beautiful card and an envelope offering the person the opportunity to make a donation to Sharp Hospice if they are so inclined. The bears are made at no charge and the donation is purely voluntary. Donations go towards supplies to make more bears!

The last two pictures are the bags of bears that were waiting to be delivered or picked up the day I took these pictures. You can see there are lots of them. Between the bears waiting to be made and the bears waiting for their new owners, I'd say there were well over 100 bears. Those bears were put together by approximately 30 regular volunteers.
Soon I will ask a few other volunteers to share their stories about making these bears. I find inspiration from those who started this long before I did.

I know a few people who have been the recipient of a Memory Bear and I'd like to share with you how they feel about the bear they have. I have heard a few stories and they are heartwarming They help me know for sure I am doing something worthwhile and helping make memories last forever.

Aug 22, 2010

June 2010: Mike Bear

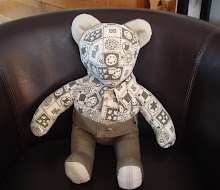
After the degree of difficulty of the Edward bears, I wanted to do something a little easier. I chose this shirt because I knew there would be no pattern matching and I also knew the fabric would be nice to work with. Plus, it was requested by Mike's daughter and that touched me. I'm still not ready to make one with my dad's shirt, but I sure could start on one for another daughter. 

I cut all the pieces out on a Sunday, planning to put Mike bear together the next weekend. You know what happens when you make plans, right. The Thursday before the planned weekend, my mother had two strokes and my family's life took a new direction. I had no idea when I would be back to sewing or even back to my own home. I considered turning the pattern pieces in and asking someone else to make the bear, but I really didn't want to do that. Fortunately, my family all pitched in and after a couple of weeks, I did have some free weekends to sew.

Getting back to sewing the bear was a pleasure. It gave me the opportunity to focus on something other than my job and my mom, which was important right then. The bear went together so easily, I was amazed. I wonder if Mike was an easy-going kind of guy. The pieces went together nicely, there wasn't a lot of fraying on the edges so I didn't have to use any lining, and the weather was nice and cool. Who could ask for more?

I made a little pocket for the front, turning the fabric wrong side out. I did the same thing for the soles of the feet for contrast.
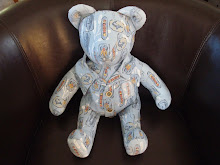
I did a little something different with this bear, adding the tag to the bottom of the back pocket. I think it looks a little like a tail and it adds a touch of whimsy to the bear. I hope Mike's daughter likes it!

Aug 11, 2010

May 2010: Edward Bears


When I went to get the clothing for new bears, I fell in love with both these shirts and thought it would be fun to make two bears for the same family again. Both shirts are long-sleeved flannel and both were soft from washing and wearing. The red/blue one seemed playful while the brown/blue one seemed more serious. I could hardly wait to get started on them because I was already seeing the shirts as bears and knew they would be well loved.

What I didn't think about until I went to cut them out was that it would be necessary (for me anyway) to match those plaids vertically and horizontally. The red plaid has a large pattern to it and matching it up was a challenge. Actually, it was a "bear" to do and it tested my patience and my crafting abilities. However, it felt so good to make it work! I was glad I did the red one first because it made the smaller pattern on the other one seem so easy!


I finished the red, white and blue bear on the Memorial Day weekend and posted it on Facebook to commemorate that day . I like to think Edward would have liked taking part of the celebration of life.  What do you think?  The brown and blue bear was finished the next weekend. When I look at the two bears together I see the fun and serious sides of Edward. I hope his family remembers both sides of this man who was loved when they see their bears.
Edward Bears May 2010