Nov 28, 2009

11/28/09: The Beginning of Leanor Bear

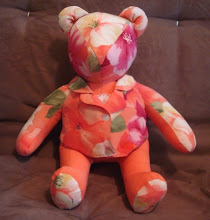
After I delivered Phillip Bear to the Sharp Hospice volunteer office, I chose the garment for my next bear.  I told them I probably couldn't do one in the two week time period they ask for, so they gave me one from farther down the list. 

This new garment is a jacket that belonged to Leanor, who passed away under hospice care. The bear I am making is the 10th bear for her family, the limit we will do for a family whose loved one was in Sharp Hospice. 

Leanor must have always smelled very good. This jacket carries her perfumed scent, one I recognize as familiar but cannot name. I believe this was something she probably wore for special occasions with pale pink pants and pretty earrings. The jacket is well made and partially lined. 

I ironed on the interfacing, laid out all the pieces and got them cut out yesterday. Everything went smoothly this time and I felt good about what I was doing. I did have a moment when I got completely confused about right side up and upside down, but this time I was able to figure it out in short order. I am using the white lining for the soles of the feet (paws) and the inside of the ears. It's too sheer to be used on its own so I'm using the jacket fabric behind the sheer fabric. I think it will look nice.  I will probably finish the assembly of the bear tomorrow and maybe even stuff it during the Charger game. Leanor was from San Diego, so I'm sure she was a Charger fan, too!

11/25/09: Returning Phillip Bear

I took Phillip to the Sharp Hospice volunteer office on Wednesday afternoon. I had thought about asking a friend who was planning to take her two bears out there for me, but decided this was one of those things I should do myself. I'm glad I did. 

Not only did I get to meet the two wonderful employees who work in the volunteer office, but I also got to see what goes on there and understand more of the process. It was interesting and it was emotional. That seems to be how this thing works!

One of the women showed me how they finish off the Memory Bears with a nice bow around their necks, with a tag saying the bear was made for them by volunteers and the name of that person on the back of the tag. Then they put the bear in a crisp white bag lined with blue tissue paper. It looks so nice when it's all put together. 

Then they contact the family to let them know their Memory Bear is ready. I was told the family usually comes in to pick up their bear(s) and that it's often a very emotional experience. Sometimes the bears are mailed to the families and sometimes the nurse who helped take care of the loved one who passed delivers the bear to the family. Thinking of that and how it would play out brought me to tears. 

Phillip Bear was met with compliments by both women and they said he would be ready for his family soon. I felt good about leaving him in their hands, knowing that in a short time he would be bringing comfort to someone who loved the man who wore the shirt that was now his body. 

I did leave with a new bag and the garment waiting to be a new bear, but that's the beginning of a new story.

Nov 22, 2009

11/22/09: Finishing Phillip Bear

My goal today was to be ready to stuff the Phillip bear by 1:15 which coincided with the kickoff of the Charger-Bronco game. I was 10 minutes late on my deadline but that's due to spilling the straightpins on the floor while attempting to get a good picture of the bear before stuffing!

First step this morning was sewing the head on. This took a little ripping out and redoing the chin in order to fit. I could hear my old neighbor from 35 years ago (a seamstress) reminding me that small errors in seam size make bigger errors as you repeat them. Lesson re-learned. After the head it was time for the legs. Once again I got my right and left confused and nearly had backwards legs, but I finally figured it out and carefully marked one leg and the corresponding opening for the leg with an X. I supposed I could have left the other leg blank but I marked it with an O instead. I'm strange that way. So here are pictures of Phillip with his head and legs on. He is ready to stuff!


I was able to sit in the comfortable couch and stuff the bear while I watched the Charger game. I followed the instructions and stuffed the head first, then the feet, legs and arms. At that point we are to sit the bear on our lap and finish stuffing the body. We do this so the bear will sit well. It was nice watching Phillip become fully himself while watching football. I have a hunch the real Phillip was a Charger fan, too. Here he is, ready to be stuffed by using the opening in the back and then finished according to the pattern instructions. 


When we are given the garment to make into a bear we are given very little leeway as to what we can do. We must follow the pattern and we must use only the pieces of the garment we are given to create the bear. No extra things of our own can be used. The bear must be made of the garment only. Also, we are not allowed to add facial features to the bears. They are to be faceless since the are in memory of a person who was known and loved by the requester. The requester can let us know if they want us to use buttons. This donor said yes, so I sewed three buttons down the center front. I also used the pocket and the tag from the back of the shirt. I put those on the back of the bear. It's a spot the recipient can use to keep a something meaningful. Here are the pictures of Phillip's finished front and back and corresponding details.


So, my first bear, Phillip, is finished and ready to get the ribbon around his neck. The ribbon will have a small tag on it, saying the bear is made by a Sharp Hospice volunteer and it will be signed by me. It seems odd to have made this bear, thinking all the time of a young man I never knew, whose family loved  him and misses him. Many times I've wanted to call the number I have on the intake form and let the requester know I was working on the Phillip bear. I wanted to ask questions about him and somehow give comfort to the family. Of course, I didn't do any of that. I'm quite sure that is not allowed as it would be such an invasion of privacy. 

I'm taking Phillip in to work with me tomorrow to share with Carolyn and Colette. Then I'll take it to the volunteer center and say goodbye to him. I suspect this will be emotional for me. I also know it will be something that heals me in little ways. One thing I know for sure, this is the first Memory Bear made by me, but it is far from the last.

Nov 21, 2009

11/21/09: The Arm Bone's Connected toThe Shoulder Bone ...

Before I get to that, take a look at Phillip Bear's fabulous head! Im really happy that it turned out as well as it did. He has a personality, don't you think?


Front, back and side of head

These pieces came together with amazing ease. I didn't understand the instructions on how to do the pleat in the ears at first, but then I remembered looking at Colette's bear at work and figured out how to make it look like that. After doing that, the instructions made sense. Go figure! It takes a total of ten pieces to get that shape to the head of the bear.
Next, I started in on attaching the arms to the body. On my first attempt I ended up with the leg attached to the shoulder. Not good. I carefully removed the stitches and took a short break. The arms were tricky to get in without catching any other parts of the bear, but I did it! Proof is below.

That's it for tonight. I want to continue but I know I'm too tired to do it right and I don't want to mess it up. Tomorrow is another day and I believe I will finish it while the Chargers beat the Broncos in the afternoon!

Thanks, friends and family, for the great comments. Your encouragement means a lot.

11/21/09: Marking, Matching and Pinning - Oh My!

Do you know what that is on the left? Oh sure, it says Dritz Tracing Paper but guess what? It's at least 40 year old tracing paper. The wheel is in there, too. It scared me a little that I knew right where it was after at least 25 years on non-use, but I put my hands right on it this morning. I wondered if the paper would even transfer to the fabric, but it did the trick with no problems. I will probably replace this with the new stuff now that I need it again. No doubt this tracing paper dye contains a gazillion bad things. Please note it was only 75 cents at time of purchase, circa 1965. Dritz now sells this (with far less paper) for around 5 dollars!

The reason for finding this was that I needed to mark my fabric pieces with the important dots and other notations I would need when I started sewing the Phillip Bear. I had forgotten that part of sewing, so it was a good thing I took the class. That turned out to be one of many times I was grateful for the class this morning.

After I marked up the fabric pieces I began matching and pinning. This sounds simple enough but I started off with a huge issue that nearly stopped me in my tracks. Now those of you who know me really well already know I have a real problem with right and left, and along with that are some spacial issues - and that's being kind to myself. Although I have a vivid imagination, I don't see how things go together in my head. I write things down, I manipulate things, I mark up maps to get somewhere, draw things out on whiteboards at work ... I can not just visualize something concrete and "get it".  

I sat down and tried to match up the front of the bear to the back of the bear. I had a picture right in front of me as to how that would look. I could not duplicate that with the pattern pieces I had in front of me. I tried and tried. I could not do it. I moved into anxiety-panic mode. What if I cut all right sides and had no left sides? What if I had just ruined this shirt and there could be no bear? Gulp! 

I poured myself a glass of iced tea, took a few deep breaths, and put those pieces aside. I matched up the ears. No problem. I matched up the center of the face with the 2 sides, no problem. My breathing became easier. I matched up the back of the head with those two sides - it's working. I matched up the arms and the legs with great ease. No problems. No matching needed for the soles of the feet. I'm good. 

I took a look at the front and back with new-found confidence. I tried to pin the back to the front for one side. It didn't 't work. Then I tried the other side - no go. Big sigh. I saw that if I traded the two fronts then the pieces actually lined up and matched like they are supposed to. But ... this makes no sense to me because it means the pattern pieces that were cut right side up don't match each other. The front of the piece cut right side up matches with the back that was cut with the pattern piece that was cut right side down. This makes no logical sense to me and it really bothers my orderly little brain. However, it works and I must accept it for what it is. (Those of you who really know me know that I won't accept this and will wrestle with it until I do make sense of it, possibly losing sleep over it.)

The pictures below are the results of this morning's marking, matching and pinning session. Looks like I forgot to capture the ears in these pictures, but rest assured, Phillip Bear will have ears! Sewing and assembly and possibly event stuffing will be later in the day ... or tomorrow. Clicking on an image will enlarge it.


Front and back of head (right side)


Front and back of head
 
Arms        

Legs

Feet

Front and Back of Body

Get out the machine, I'm ready to go!

Nov 19, 2009

11/19/09: A Bump In The Road for Phillip Bear

Last night I cut out all the pieces and there are lots of them. Most of the pieces need to be cut twice, one right side up and one right side down on the fabric. As I mentioned earlier, that's why I made the yellow pieces. They would all go right side down. It was a perfect plan. You can see in my picture from the night before that I had it all laid out correctly. Well, after I took that picture, I moved things around a bit to get some pieces to match up better. Then last night I laid a few down to finish and put a yellow one right side up! I didn't notice this until I went to match everything up before I went to bed. I was so excited to see how it was all going to come together and could already envision Phillip Bear with his blue body and white spots in just the right places. Then I saw the blue back was going to have one side inside out if I went with what I cut. Oops! I'm guessing this happens to every bear maker at least once. At least that's what I'm telling myself! Tonight I will lay that pattern piece (right side down) on some of the remaining fabric and I'll be good to go.

Nov 18, 2009

11/18/09: The Phillip Bear Day One

I spent most of yesterday obsessed with the making of the Phillip Bear. I talked to everyone who would listen about how moved I was by the class and how much I wanted to be home working on the bear. I spent my free time making copies of the pattern pieces and organizing a notebook for my information and the pictures that will follow. 


After dinner I finally got to start on the Phillip Bear. I cut the shirt to make flat pieces of fabric, ironed the fusible interfacing the the inside of those pieces and began laying out the pattern pieces. All of this I did with a sense of honor and a bit of fear. This was Phillip's shirt and I only had one set of cuts! The shirt had just a large light colored flowers on it. I knew I wanted those to be the pads on the bear's feet, the inside of his ears and the center of his face. Those pieces went down first. Then the other pattern pieces went down, following the grain and all of that important stuff. This took much longer than I expected but experienced bear makers told me this is often the hardest part and even with careful planning the bear may not look like what you envisioned. Good to know.

I finished laying pattern pieces out and rough cutting the pieces. Tonight I will do the real cutting, being careful to be as precise as possible. My goal is to finish cutting and pinning pieces together tonight so I will be ready to sit down and sew on Thursday. I may wait until the weekend to sew ... but I may not! I am excited to get these pieces together and creating this bear. 

I have two weeks to complete this first little guy. When I turn him in I can get another bag with a garment in it or I can wait until I know I have the time to make one and pick one up them. I know I will wait because I have the fabric for another bear waiting for me. It's been waiting for several months. That's another story for another day. Right now it's all about Phillip.

11/17/09: Beginning the Bear Journey

Yesterday I took the first step in my journey towards being a Sharp Hospice Memory Bear Volunteer. This is something I've been wanting to do for quite awhile but the timing of the training never seemed to work out for me. I took yesterday as a vacation day so I could get the training and get going on my first bear.

What? You don't know about these bears? You can read all about them here Sharp HospiceCare Memory Bears. Basically, they are bears made from the clothing of a loved one who has passed away. Sharp Hospice volunteers make them for the family member who requests them. All experienced local people who sew are welcome to take the free class and begin creating a Memory Bear that very day.

Yes, that's right. There's no practice or waiting time. There's a long list of people waiting for their bear and the volunteers are put to work immediately! It's a little intimidating to think about but it's really a good plan. It's possible to back out at that point, but I doubt anyone has. The volunteers to teach and demonstrate and support the trainees are so helpful and optimistic that one feels quite confident they can do this. 

Pam, who has made over 800 Memory Bears in 8 years, demonstrated how to sew and assemble the bears. Oh my. She made it look easy and assured us that we could do it that easily after we put four bears together. Apparently that's the magic number. Good to know. Her fabric was from a woman's capris, very colorful in spring tones. She put the head together first and that little bear came alive for all of us right then. I got a little teary-eyed looking at that little face, knowing that soon it would be a bear for someone to love. Pam finished making and stuff her bear in an hour, all the while talking to us about what she was doing and giving us helpful hints along the way. Amazing!


When that was finished we were free to choose a bag with a garment in it and get started on our first Memory Bear. I was drawn to a bag with a blue Hawaiian print shirt. When I opened the bag I got a whiff of the person's smell and realized why we aren't to wash the clothing. Then I read the name of the man who wore it and that it was his dad's favorite shirt. Well the tears came in full force at that point. One of the volunteers assured me that was normal and let me be alone with my thoughts and prayers. 


Some people started right in cutting their garments open and ironing them flat, pinning pattern pieces on and cutting away. Not me. I had to sit for awhile with the shirt and honor the man who had worn it and feel right about starting it on a new life. I spent the rest of my time looking at what others were doing and asking questions of the volunteers. I knew I was on another life-changing journey and I wanted to savor the beginning of that with Phillip's blue Hawaiian shirt.